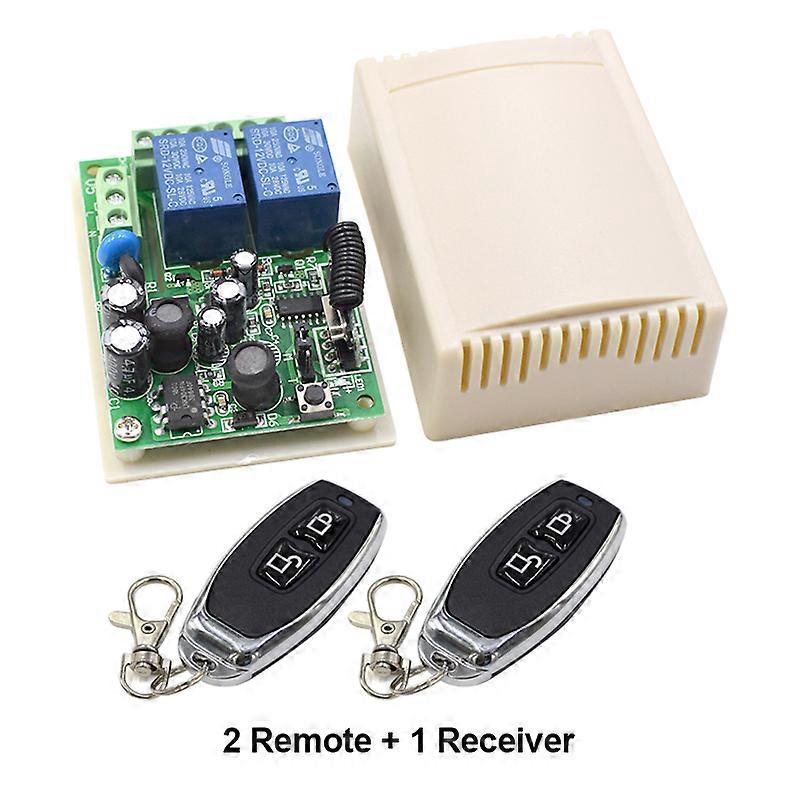
433 MHz AC 110V 220V Wireless 2CH RF Transmitter Remote Control Switch + RF Relay Receiver For Light Garage Door Opener

€34.95
+ €10.49 Shipping

433 MHz AC 110V 220V Wireless 2CH RF Transmitter Remote Control Switch + RF Relay Receiver For Light Garage Door Opener

  • Brand: Unbranded
Sold by:

433 MHz AC 110V 220V Wireless 2CH RF Transmitter Remote Control Switch + RF Relay Receiver For Light Garage Door Opener

  • Brand: Unbranded
RRP: €45.95
Price: €34.95
You save: €11.00 (23%)
Sold by:
€34.95
+ €10.49 Shipping

In stock

We accept the following payment methods

Description

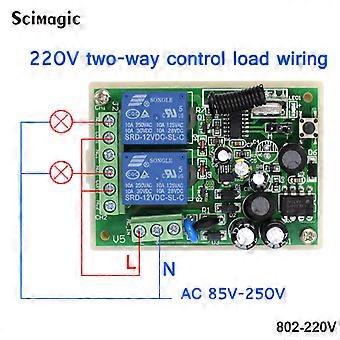
433Mhz Remote Control Switch for Light,Door, Garage Universal Remote AC 85V ~ 250V 110V 220V 2CH Relay Receiver and Controller Include Package 1 include 1PCS remote and 1PCS receiver Package 2 include 2PCS remote and 1PCS receiver Package 4 include 1PCS remote Specifications Of The Transmitter: Model Number : SMG-004 Operating Frequency: 433MHz Power by 3V Coin Cell Button Battery (Battery included ) Material: PVC Button: 2 Buttons Size: 59mm x 28mm x 8mm Operating Voltage: 3V Operating Current: 12mA Transmitting Power: 10mw Modulation Mode: ASK (AM) Encoding Type: Learning Transfers Distance: 20-50 m Specifications Of The Receiver: Model Number : SMG-802-220V Product Type: Dual Channel Remote Control Switch Encoding Type: Intelligent Learning Code RF Working Mode: Superheterodyne Reception Modulation Mode: ASK Working Mode: Momentary, Toggle and Latching Mode. RF Frequency: 433MHz Input Voltage: AC 85V~250V Standby Current:97dbm Remote Control Range: >50m (Free Space) Wired Connection Way: Fixed Wiring Pillar Output Terminal: NO, COM, NC On-off Output (Wire Port): NO(Normal Open), COM(Commonality End), NC(Normally Closed End). Color: Green (PCB Board), White (Outside Shell) Circuit Board Size: 7.3 * 5.2 * 2.5cm Circuit Connection modes Please Note: the Receiver Switch Module part have 2 ways of working mode.The OUTPUT signal has 2 Voltage Level. It decided by the INPUT of the COM pin. OUTPUT mode 1 Connect the COM to the Power Supply by AC 85-250V, the Output pin will create AC 85-250V Signal. Please check below diagram for better understanding. OUTPUT mode 2 Connect the COM pin with any other Additional Power Supplythe output will create the same Voltage signal as the Additional Power Supply. it can be Direct Current or Alternating Current. Decided by the Additional Power Supply. BUT, Please note: the additional Power Supply should be in the range of the Receiver Switch Module-(DC5-12V, AC 85-250V). Please check below diagram for better understanding. Wiring diagram example About Working mode: Momentary:Push the remote button , the relay connects, release the remote button , the relay dis-connects. Toggle:Push once the remote button , the relay connects , push twice the remote button , the relay dis-connects. Interlock:Push the remote button A ,frist relay connects ,Push the remote button B ,the second relay connects and frist relay dis-connects.When you Push button A again ,frist relay connects and the second relay dis-connects.Push other remote button,frist relay and the second relay all dis-connect. Set up : Momentary Mode STEP 1 Press the learning button on the Receiver board once. Wait for a moment , the LED will turn off , indicating you entered the learning state. STEP 2 Press one button on the Remote Control , the LED on the receiver board will flash on then off indicating the button was learned. STEP 3 Press another button on the Remote Control, watching the LED go on and off again. Wait 3 seconds, the LED will turn on again, indicating system is ready for use. Set up :Toggle Mode STEP 1 Press the learning button on the Receiver board twice. Wait for a moment , the LED will turn off , indicating you entered the learning state. STEP 2 Press one button on the Remote Control, the LED on the receiver board will flash on then turn off , indicating the button was learned. STEP 3 Press another button on the Remote Control , watching the LED go on and off again. Wait 3 seconds, the LED indicator will turn on again , indicating system is ready for use Set up : L atched Mode STEP 1 Press the learning button on the Receiver board 3 times. STEP 2 Press one button on the Remote Control, STEP 3 Press another button on the Remote Control Wait 3 seconds, the LED indicator will turn on again , indicating system is ready for use On this products details page, there is a demonstration video available. Delete the existing data about remote mode Note: When you receive our products, it maybe set in one remote mode randomly, that because each product got test when it can be arranged to shipment.So, please delete the existing data about remote mode for the first application. Press the learning button on the Receiver Switch Module board 8 times , the existing data are deleted successfully. After deleted the data, all the remote control cannot work any more. *If you do not understand. Please use the computer to view the video in the product details page or send us a message.*
  • Fruugo ID: 320544840-711491135
  • EAN: 6382839123230

Product Safety Information

Please see the product safety information specific to this product outlined below

The following information is provided by the independent third-party retailer selling this product.

Product Safety Labels

CE Mark
Safety Warnings: Not suitable for children under 36 months, Choking Hazard, Adult supervision recommended
Ingredients: Polymethylsilsesquioxane

Delivery & Returns

Dispatched within 3 days

  • STANDARD: €10.49 - Delivery between Mon 20 October 2025–Tue 28 October 2025

Shipping from China.

We do our best to ensure that the products that you order are delivered to you in full and according to your specifications. However, should you receive an incomplete order, or items different from the ones you ordered, or there is some other reason why you are not satisfied with the order, you may return the order, or any products included in the order, and receive a full refund for the items. View full return policy

Product Compliance Details

Please see the compliance information specific to this product outlined below.

The following information is provided by the independent third-party retailer selling this product.

Manufacturer
The following information outlines the contact details for the manufacturer of the relevant product sold on Fruugo.

  • Wuhan Baoyucheng Technology
  • Wuhan Baoyucheng Technology
  • Room 3, Floor 8, Unit 2, Building 133, Phase 3 (Fengjing), Wuhan Country Garden,
  • Qingjiang Brigade, Wujin Farm, Dongjing Street, Hannan District,
  • Wuhan
  • CN
  • 430090
  • tonghuashun3k@163.com
  • 17348820611

Responsible Person in the EU
The following information outlines the contact information for the responsible person in the EU. The responsible person is the designated economic operator based in the EU who is responsible for the compliance obligations relating to the relevant product sold into the European Union.

  • Van Lavazza
  • Y & H S.R.L.
  • Via Gravina 21 MT matera
  • Puglia
  • Trani
  • IT
  • 75100
  • itlyhsrl@gmailcom
  • 0039 3917722149